Adventures in bargain hunting

Adventures in bargain hunting and creating style from 'drek'

Sunday, March 25, 2012

tiny kitchen makeover - part 1

OK so you saw the post about painting the cabinets white. I was reading my Better Homes & Gardens magazine and every blurb and picture in there seemed to concur that white with white opens up small spaces, the more light the better.

Naturally, I had to paint something - again! A couple years ago, my husband and I made a mosaic tile back splash in our kitchen. Tiling is actually very simple, cutting tile seems to be the scariest part. I used 1 x 1inch tiles so cutting them was simple with a handheld tile cutter. The tiles were green and brown earthy tones since I thought that was a neutral...I was wrong. Check this out:
If you are thinking of doing the same, they sell 1 x 1 foot mosaic tile sheets connected with netting on the back.
Pretty... but my colors are now blues with Earth tones. I painted this in the same way I did the bathroom counter - white primer all around.
Tip- use a travel bar soap holder for small rollers!

Of course I taped off the counters and removed the face plates. I used a sponge roller and did about 3-4 coats and touch ups. I let it dry for at least 4 hours.

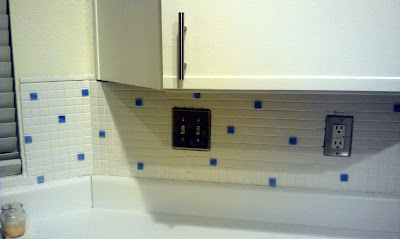
I decided to add some blue tiles randomly for some color and 3 dimensional effect. Luckily I was able to find this perfect little package of blue tiles at Micheal's for $4.99 and the color was pretty close to what I have on a couple of walls in my house.
I added the tiniest bit of Gorilla Glue and just started popping them around the back splash (yes, I'm sure there are more sophisticated ways to attach these, but I was not going out to the store again!).
Ta-Da! Updated and bright :-) I love it! So does the hubs!

Here's your totals breakdown:
Quart of Primer - $13.92
Tiles - $4.99
Sponge roller - $1.00 (seriously!)
Total: $19.91

Next I am planning to open up some shelving, another cool tip I got from Better Homes and Gardens!

Sunday, March 4, 2012

Put some Paint On It! Part 2

A week after I refreshed my kitchen (for the second time), I saw something on a DIY Network show about 10 cheap fixes for bathrooms and they painted TILE!!! So cool! I tried to find a link to that particular show but couldn't get it on their website. But you can check out their main page here) The video I referenced while finding more tips on tile painting was from HGTV's website.

My bathroom tile on the floor and the vanity is less than stellar to look at and does not go with the house at all. We are pretty sure we got this house in the middle of a remodel (short sale) and they had finished some rooms, not finished others and had opposite taste of my husband and I in some cases; with the master bath being the biggest opposite. The sinks are black and rectangular thus making them impossible to clean since they show everything, oh and the toilet is black... you read that right: black. The vanity tiles have some sort of Egyptian designs on them including but not limited to: King Tut, a beetle, an aloe looking plant and some other tribal-esque designs. And they are the color that matches the Spanish tile on the floor with a surprisingly lovely green wall color. Anybody else confused?

this picture doesn't show the floor but you can see the black toilet to the right
Anyways, at the hardware store I found a primer that had everything in it and was tintable. I wanted white and the primer was already white. I figured black with white made more sense than black with pink/orange. . I used Zinsser B-I-N Primer Sealer "Ultimate Stain Blocker".


This stuff was great, and I only had to buy a pint since the surface area is small (didn't use the spray that you see above). I used a tiny sponge roller to apply and a foam brush for the smaller areas around the sinks and in the corners. It needed about 4-5 coats and at least 45 minutes between coats. The great thing is you can paint right over the grout too and it gives it a really cool look. I may eventually need to go over everything  with polyurethane for water resistance, but so far so good. I have not had any issues with water penetrating the paint since we have been wiping up any that gets on there, which is just good cleaning practice anyway.
*Tip on primer/sealer: it is a lot thinner than paint and it will create tiny bubbles when you roll it on with your sponge roller, they do pop and the paint ends up smooth.
Transformed:
Just realized there is a little hair tie on the floor that my Midge kitty must have been playing with
 Now you can see the Spanish tile floor, that may be next! Unfortunately the above picture does not show the detail in the painted tile, so here you go:

  
notice the black sink detail and the fancy tile design

Totals:
1 pint of primer/sealer: $10
supplies: $4
Yep... I transformed my bathroom vanity without demolition or replacing anything for $14!!!
Bathroom floor: I'm coming for you! :-)

Put some paint on it! Part 1

Ever see the movie 'My Big Fat Greek Wedding'? The father used Windex as a cure for everything; have a pimple? "Put some Windex!" I feel the same way about paint, although definitely not for a pimple (then again, makeup has been referred to as "war paint"). Based on the title of my blog and its' contents from my first post I am sure you know by now that I am a savvy shopper. Paint is one of the most simple and inexpensive ways to update almost anything. There are so many different types of paint for every surface imaginable.

Since I have not chronicled every project before creating this blog, I will list a few of the things I have painted and my very basic knowledge on the subject.

We bought our 900 square foot second floor condominium in 2008 and it looks quite different inside now. The kitchen cabinets were my first and least favorite thing and had to go! Here they were:

 I think they are some sort of cheap material and a tiny bit of wood. My guess is press board covered with some sort of white overlay? I just hollered to my husband asking him what they were made of and his response was "I don't know what that's called...crap?" My thoughts exactly! The little bits of wood make even less sense, but it is in almost every house in this small growing city built around the 80's and 90's. Cookie cutter get-it-done-as-fast-as-you-can-build-it condo's.

Basic wall paint did the trick. I think the invention of the primer and paint in one is genius and has saved me loads of time and money. I asked the nice people at Lowe's what they would use over the cabinets, being in this area they knew the surface I was trying to cover well. They advised me to get the paint with primer and in a semi-gloss or eggshell finish. This job was time consuming but very basic: take the cabinet doors off  and paint the doors and the cabinet structures/frames separately. Do at least 2 coats and use sponge rollers instead of the normal ones you would use for texture on your walls. You want it to be flat and not noticeable that you painted them. Attach the doors back on and voila!

About 18 months after this I decided to do a backsplash with mosaic tiles. But I will cover that in another blog. The counter tops are definitely Formica or something similar or a very cheap laminate. That I will change in time, but it will be more difficult and expensive.

Here's funny story: about a month or two ago I began to hate the brown on the cabinets as my kitchen was already so small and it made it very dark. After 3 years I hated it! So I of course said to myself: paint it!

I went all white this time to open up the space and based on HGTV and Pinterest I have been seeing a lot of white countertops with white cabinets and stainless steel appliances. My original thought was that stainless required dark colored features around it, but I was very wrong and I am now loving my kitchen and am in there a lot more... in fact, there's dinner on the stove:

Added some new sleek modern hardware this time and it really made a difference. The cost of paint and hardware with differ obviously depending on kitchen sizes, but I only needed one gallon of paint each time and the hardware was the most expensive at about $3-4 a piece.
*Tip for hardware/cabinet pulls: if you chose a basic design stores will carry them in packages of 10 or more and you save some bucks!

Totals (these are approximate as I didn't keep track for the blog, sorry!):
gallon of paint + primer: $36
supplies: roughly $15
hardware: $70
Fresh kitchen: about $121 ...not bad!

 *See painting part 2 and eventually a did-it-myself backsplash blog...